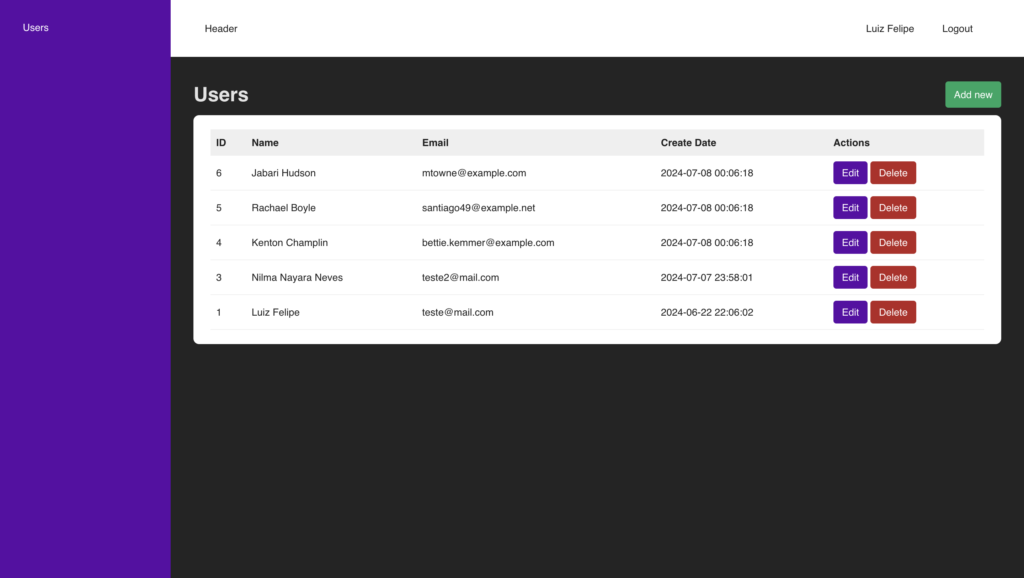
#02 – Creating a User Management System with React and Axios – Series: Creating a User Management System with Laravel, React, and Docker

Part 2: Creating a User Management System with React and Axios

Introduction

In this tutorial, you will learn how to create a user management system using React for the front-end and Axios for communication with the back-end. We will cover creating routes, views, components, contexts, and configuring Axios. By the end, you will have a functional system with features for user login, registration, listing, editing, and deletion. Check repository.

Prerequisites

Step 1: Project Setup

Installing Dependencies

First, create a new React project and install the necessary dependencies:

npm install axios react-router-dom

Project Structure

Organize your project as follows:

Step 2: Context Setup

ContextProvider.jsx

Create a ContextProvider.jsx file inside the contexts folder to manage the application’s global state, including authenticated user and token.

import { createContext, useContext, useState } from "react";

const StateContext = createContext({

   token: null,

   user: null,

   notification: null,

   setToken: () => {},

   setUser: () => {},

   setNotification: () => {}

});

export const ContextProvider = ({ children }) => {

   const [user, setUser] = useState({});

   const [notification, _setNotification] = useState('');

   const [token, _setToken] = useState(localStorage.getItem('ACCESS_TOKEN'));

   const setToken = (token) => {

       _setToken(token);

       if (token) {

           localStorage.setItem('ACCESS_TOKEN', token);

       } else {

           localStorage.removeItem('ACCESS_TOKEN');

       }

   };

   const setNotification = message => {

       _setNotification(message);

       setTimeout(() => {

           _setNotification('');

       }, 5000);

   };

   return (

       <StateContext.Provider value={{ user, token, notification, setToken, setUser, setNotification }}>

           {children}

       </StateContext.Provider>

   );

};

export const useStateContext = () => useContext(StateContext);

Step 3: Axios Configuration

.env

Create a .env file to store environment variables, including the base URL (VITE_API_BASE_URL) for accessing the backend:

VITE_API_BASE_URL=http://localhost

axios-client.js

Create an axios-client.js file to configure Axios, including the base URL and interceptors to manage the authentication token.

import axios from "axios";

const axiosClient = axios.create({

   baseURL: `${import.meta.env.VITE_API_BASE_URL}/api`

});

axiosClient.interceptors.request.use((config) => {

   const token = localStorage.getItem('ACCESS_TOKEN');

   config.headers.Authorization = `Bearer ${token}`;

   return config;

});

axiosClient.interceptors.response.use((response) => {

   return response;

}, (error) => {

   const { response } = error;

   if (response.status === 401) {

       localStorage.removeItem('ACCESS_TOKEN');

   }

   throw error;

});

export default axiosClient;

Step 4: Layout Components Creation

DefaultLayout.jsx

Create a DefaultLayout.jsx file inside the components folder to define the default layout for protected pages.

import { Link, Navigate, Outlet } from "react-router-dom";

import { useStateContext } from "../contexts/ContextProvider";

import { useEffect } from "react";

import axiosClient from "../axios-client";

export default function DefaultLayout() {

   const { token, user, setUser, setToken, notification } = useStateContext();

   if (!token) {

       return <Navigate to={'/login'} />

   }

   const onLogout = (e) => {

       e.preventDefault();

       axiosClient.post('/logout')

       .then(() => {

           setUser({});

           setToken(null);

       });

   };

   useEffect(() => {

       axiosClient.get('/user')

       .then(({ data }) => {

           setUser(data);

       });

   }, []);

   return (

       <div id="defaultLayout">

           <aside>

               <Link to="/dashboard">Dashboard</Link>

               <Link to="/users">Users</Link>

           </aside>

           <div className="content">

               <header>

                   <div>Header</div>

                   <div>

                       {user.name} &nbsp; &nbsp;

                       <a onClick={onLogout} className="btn-logout" href="#">Logout</a>

                   </div>

               </header>

               <main>

                   <Outlet/>

               </main>

               {notification &&

               <div className="notification">

                   {notification}

               </div>

               }

           </div>

       </div>

   );

}

GuestLayout.jsx

Create a GuestLayout.jsx file inside the components folder to define the layout for public pages.

import { Navigate, Outlet } from "react-router-dom";

import { useStateContext } from "../contexts/ContextProvider";

export default function GuestLayout() {

   const { token } = useStateContext();

   if (token) {

       return <Navigate to={'/'} />

   }

   return (

       <>

           <Outlet />

       </>

   );

}

Step 5: Views Creation

Login.jsx

Create a Login.jsx file inside the views folder for the login page.

import { useRef, useState } from "react";

import { Link } from "react-router-dom";

import axiosClient from "../axios-client";

import { useStateContext } from "../contexts/ContextProvider";

export default function Login() {

   const [errors, setErrors] = useState(``);

   const emailRef = useRef();

   const passwordRef = useRef();

   const { setUser, setToken } = useStateContext();

   const onSubmit = (e) => {

       e.preventDefault();

       const payload = {

           email: emailRef.current.value,

           password: passwordRef.current.value,

       };

       axiosClient.post('/login', payload)

       .then(({ data }) => {

           setUser(data.user);

           setToken(data.token);

       })

       .catch(err => {

           const response = err.response;

           if (response && response.status === 422) {

               if (response.data.errors) {

                   setErrors(response.data.errors);

               } else {

                   setErrors({ email: [response.data.message] });

               }

           }

       });

   };

   return (

       <div className="login-signup-form animated fadeInDown">

           <div className="form">

               <form onSubmit={onSubmit}>

                   <h1 className="title">Login into your account</h1>

                   {errors &&

                       <div className="alert">

                           {Object.keys(errors).map(key => (

                               <p key={key}>{errors[key][0]}</p>

                           ))}

                       </div>

                   }

                   <input ref={emailRef} type="email" placeholder="Email" />

                   <input ref={passwordRef} type="password" placeholder="Password" />

                   <button className="btn btn-block">Login</button>

                   <p className="message">Not registered? <Link to="/signup">Create an account</Link></p>

               </form>

           </div>

       </div>

   );

}

SignUp.jsx

Create a SignUp.jsx file inside the views folder for the signup page.

import { useRef, useState } from "react";

import { Link } from "react-router-dom";

import axiosClient from "../axios-client";

import { useStateContext } from "../contexts/ContextProvider";

export default function SignUp() {

   const nameRef = useRef();

   const emailRef = useRef();

   const passwordRef = useRef();

   const passwordConfirmationRef = useRef();

   const [errors, setErrors] = useState(null);

   const { setUser, setToken } = useStateContext();

   const onSubmit = (e) => {

       e.preventDefault();

       const payload = {

           name: nameRef.current.value,

           email: emailRef.current.value,

           password: passwordRef.current.value,

           password_confirmation: passwordConfirmationRef.current.value,

       };

       axiosClient.post('/signup', payload)

       .then(({ data }) => {

           setUser(data.user);

           setToken(data.token);

       })

       .catch(err => {

           const response = err.response;

           if (response && response.status === 422) {

               setErrors(response.data.errors);

           }

       });

   };

   return (

       <div className="login-signup-form animated fadeInDown">

           <div className="form">

               <form onSubmit={onSubmit}>

                   <h1 className="title">Signup for Free</h1>

                   {errors &&

                       <div className="alert">

                           {Object.keys(errors).map(key => (

                               <p key={key}>{errors[key][0]}</p>

                           ))}

                       </div>

                   }

                   <input ref={nameRef} type="text" placeholder="Full Name" />

                   <input ref={emailRef} type="email" placeholder="Email" />

                   <input ref={passwordRef} type="password" placeholder="Password" />

                   <input ref={passwordConfirmationRef} type="password" placeholder="Password Confirmation" />

                   <button className="btn btn-block">Signup</button>

                   <p className="message">Already Registered? <Link to="/login">Sign in</Link></p>

               </form>

           </div>

       </div>

   );

}

Users.jsx

Create a Users.jsx file inside the views folder for the users list page.

import { useEffect, useState } from "react";

import axiosClient from "../axios-client";

import { Link } from "react-router-dom";

import { useStateContext } from "../contexts/ContextProvider";

export default function Users() {

   const [users, setUsers] = useState([]);

   const [loading, setLoading] = useState(false);

   const { setNotification } = useStateContext();

   useEffect(() => {

       getUsers();

   }, []);

   const getUsers = () => {

       setLoading(true);

       axiosClient.get('/users')

       .then(({ data }) => {

           setLoading(false);

           setUsers(data.data);

       })

       .catch(() => {

           setLoading(false);

       });

   };

   const onDelete = (u) => {

       if (!window.confirm("Are you sure you want to delete this user?")) {

           return;

       }

       axiosClient.delete(`/users/${u.id}`)

       .then(() => {

           setNotification('User was successfully deleted');

           getUsers();

       });

   };

   return (

       <div>

           <div style={{ display: 'flex', justifyContent: 'space-between', alignItems: 'center' }}>

               <h1>Users</h1>

               <Link className="btn-add" to="/users/new">Add new</Link>

           </div>

           <div className="card animated fadeInDown">

               <table>

                   <thead>

                       <tr>

                           <th>ID</th>

                           <th>Name</th>

                           <th>Email</th>

                           <th>Created Date</th>

                           <th>Actions</th>

                       </tr>

                   </thead>

                   {loading &&

                       <tbody>

                           <tr>

                               <td colSpan="5" className="text-center">

                                   Loading...

                               </td>

                           </tr>

                       </tbody>

                   }

                   {!loading &&

                       <tbody>

                           {users.map(u => (

                               <tr key={u.id}>

                                   <td>{u.id}</td>

                                   <td>{u.name}</td>

                                   <td>{u.email}</td>

                                   <td>{u.created_at}</td>

                                   <td>

                                       <Link className="btn-edit" to={'/users/' + u.id}>Edit</Link>

                                       &nbsp;

                                       <button className="btn-delete" onClick={ev => onDelete(u)}>Delete</button>

                                   </td>

                               </tr>

                           ))}

                       </tbody>

                   }

               </table>

           </div>

       </div>

   );

}

UserForm.jsx

Create a UserForm.jsx file inside the views folder for the user creation and update form.

import { useNavigate, useParams } from "react-router-dom";

import { useEffect, useState } from "react";

import axiosClient from "../axios-client";

import { useStateContext } from "../contexts/ContextProvider";

export default function UserForm() {

   const { id } = useParams();

   const navigate = useNavigate();

   const [loading, setLoading] = useState(false);

   const [errors, setErrors] = useState(null);

   const { setNotification } = useStateContext();

   const [user, setUser] = useState({

       id: null,

       name: '',

       email: '',

       password: '',

       password_confirmation: ''

   });

   if (id) {

       useEffect(() => {

           setLoading(true);

           axiosClient.get(`/users/${id}`)

           .then(({ data }) => {

               setLoading(false);

               setUser(data);

           })

           .catch(() => {

               setLoading(false);

           });

       }, []);

   }

   const onSubmit = (e) => {

       e.preventDefault();

       if (user.id) {

           axiosClient.put(`/users/${user.id}`, user)

           .then(() => {

               setNotification('User was successfully updated');

               navigate('/users');

           })

           .catch(err => {

               const response = err.response;

               if (response && response.status === 422) {

                   setErrors(response.data.errors);

               }

           });

       } else {

           axiosClient.post(`/users`, user)

           .then(() => {

               setNotification('User was successfully created');

               navigate('/users');

           })

           .catch(err => {

               const response = err.response;

               if (response && response.status === 422) {

                   setErrors(response.data.errors);

               }

           });

       }

   };

   return (

       <>

           {user.id && <h1>Update User: {user.name}</h1>}

           {!user.id && <h1>New User</h1>}

           <div className="card animated fadeInDown">

               {loading && (

                   <div className="text-center">

                       Loading...

                   </div>

               )}

               {errors && (

                   <div className="alert">

                       {Object.keys(errors).map(key => (

                           <p key={key}>{errors[key][0]}</p>

                       ))}

                   </div>

               )}

               {!loading && (

                   <form onSubmit={onSubmit}>

                       <input value={user.name} onChange={e => setUser({...user, name: e.target.value})} placeholder="Name" />

                       <input value={user.email} onChange={e => setUser({...user, email: e.target.value})} placeholder="Email" />

                       <input type="password" onChange={e => setUser({...user, password: e.target.value})} placeholder="Password" />

                       <input type="password" onChange={e => setUser({...user, password_confirmation: e.target.value})} placeholder="Password Confirmation" />

                       <button className="btn">Save</button>

                   </form>

               )}

           </div>

       </>

   );

}

NotFound.jsx

Create a NotFound.jsx file inside the views folder for the 404 error page.

export default function NotFound() {

    return(

        <div className="container">

            <p className="text-center">404 - Not Found</p>

        </div>

    );

}

Step 6: Routing

router.jsx

Create a router.jsx file to define the application routes using react-router-dom.

import { createBrowserRouter, Navigate } from "react-router-dom";

import Login from "./views/Login";

import SignUp from "./views/SignUp";

import Users from "./views/Users";

import NotFound from "./views/NotFound";

import UserForm from "./views/UserForm";

import DefaultLayout from "./components/DefaultLayout";

import GuestLayout from "./components/GuestLayout";

const router = createBrowserRouter([

   {

       path: '/',

       element: <DefaultLayout />,

       children: [

           {

               path: '/',

               element: <Navigate to="/users" />

           },

           {

               path: '/users',

               element: <Users />

           },

           {

               path: '/users/new',

               element: <UserForm key="userCreate" />

           },

           {

               path: '/users/:id',

               element: <UserForm key="userUpdate" />

           }

       ]

   },

   {

       path: '/',

       element: <GuestLayout />,

       children: [

           {

               path: '/login',

               element: <Login />

           },

           {

               path: '/signup',

               element: <SignUp />

           }

       ]

   },

   {

       path: '*',

       element: <NotFound />

   }

]);

export default router;

Step 7: Initialization of the Application

main.jsx

Configure the main.jsx file to initialize the application, provide routes for the pages, and manage user and token information via context for the system.

import React from 'react';

import ReactDOM from 'react-dom/client';

import { RouterProvider } from 'react-router-dom';

import { ContextProvider } from './contexts/ContextProvider';

import router from './router';

import './index.css';

ReactDOM.createRoot(document.getElementById('root')).render(

   <React.StrictMode>

       <ContextProvider>

           <RouterProvider router={router} />

       </ContextProvider>

   </React.StrictMode>,

);

index.css

Add basic application styles to the index.css file.

:root {

  font-family: Inter, system-ui, Avenir, Helvetica, Arial, sans-serif;

  line-height: 1.5;

  font-weight: 400;

  color-scheme: light dark;

  color: rgba(255, 255, 255, 0.87);

  background-color: #242424;

  font-synthesis: none;

  text-rendering: optimizeLegibility;

  -webkit-font-smoothing: antialiased;

  -moz-osx-font-smoothing: grayscale;

}

@import url('https://fonts.googleapis.com/css2?family=Open+Sans:ital,wght@0,300;0,400;0,500;0,600;0,700;0,800;1,300;1,400;1,500;1,600;1,700;1,800&display=swap');

* {

    box-sizing: border-box;

}

html, body, #root, #defaultLayout, #guestLayout {

    min-height: 100vh;

}

h1, h2, h3, h4, h5, h6, p {

    margin: 0;

}

body {

    font-family: 'Open Sans', sans-serif;

    margin: 0;

    padding: 0;

    font-size: 14px;

}

input {

    outline: 0;

    background: #ffffff;

    color: #212121;

    width: 100%;

    border: 2px solid #e6e6e6;

    margin: 0 0 15px;

    padding: 15px;

    box-sizing: border-box;

    font-size: 14px;

    transition: all 0.3s;

}

input:focus {

    border-color: #5b08a7;

}

.container {

    display: flex;

    align-items: center;

    justify-content: center;

    height: 100vh;

    font-size: 1.2rem;

}

.btn,

.btn-add,

.btn-edit,

.btn-delete {

    font-family: "Roboto", sans-serif;

    outline: 0;

    background: #5b08a7;

    border: 0;

    text-decoration: none;

    padding: 15px;

    color: #FFFFFF;

    font-size: 16px;

    -webkit-transition: all 0.3 ease;

    transition: all 0.3 ease;

    cursor: pointer;

}

.btn-block {

    width: 100%;

}

.btn-add,

.btn-edit,

.btn-delete{

    padding: 0.5rem 0.75rem;

    font-size: 14px;

    border-radius: 4px;

}

.btn-add {

    background-color: #00a762;

}

.btn-delete {

    background-color: #b72424;

}

.btn-logout {

    text-decoration: none;

    padding: 0.75rem 1.5rem;

    color: #212121;

    transition: all 0.3s;

    border-radius: 6px;

}

.btn-logout:hover {

    background-color: rgba(0, 0, 0, 0.1);

}

.btn:hover,

.btn:active,

.btn:focus {

    background: #5b08a7;

}

.text-center {

    text-align: center;

}

table {

    width: 100%;

    border-spacing: 0;

    border-collapse: collapse;

}

table > thead > tr > th {

    text-align: left;

    padding: 0.5rem 0.5rem;

    background-color: #efefef;

    color: #212121;

}

table > tbody > tr > td {

    padding: 0.5rem 0.5rem;

    border-bottom: 1px solid #efefef;

    white-space: nowrap;

    color: #212121;

}

.card {

    background-color: #FFF;

    border-radius: 0.5rem;

    box-shadow: 1px 1px 3px rgba(0, 0, 0, 0.1);

    padding: 1.25rem 1.5rem;

    margin-bottom: 1rem;

    margin-top: 0.5rem;

}

.alert {

    padding: 1rem;

    background-color: #ff4040;

    color: white;

    border-radius: 0.5rem;

    margin-bottom: 1rem;

}

.notification {

    position: fixed;

    right: 1rem;

    bottom: 1rem;

    z-index: 100;

    padding: 1rem 1.5rem;

    background-color: #00a762;

    color: white;

    border-radius: 0.5rem;

}

/* Login/Signup forms*/

.login-signup-form {

    height: 100vh;

    display: flex;

    justify-content: center;

    align-items: center;

}

.login-signup-form .form {

    width: 360px;

    position: relative;

    z-index: 1;

    background: #FFFFFF;

    max-width: 360px;

    padding: 34px;

    box-shadow: 0 0 2px 0 rgba(0, 0, 0, 0.1);

}

.login-signup-form .title {

    font-size: 20px;

    margin-bottom: 1rem;

    text-align: center;

    color: #212121;

}

.login-signup-form .form .message {

    margin: 15px 0 0;

    color: #b3b3b3;

    font-size: 16px;

    text-align: center;

}

.login-signup-form .form .message a {

    color: #5b08a7;

    text-decoration: none;

}

/* Login/Signup form */

#defaultLayout {

    display: flex;

}

#defaultLayout aside {

    width: 240px;

    background-color: #5b08a7;

    padding: 1rem

}

#defaultLayout aside > a {

    display: block;

    padding: 0.75rem 1rem;

    border-radius: 6px;

    color: white;

    text-decoration: none;

    transition: all 0.2s;

}

#defaultLayout aside > a:hover {

    background-color: rgba(0, 0, 0, 0.2);

}

#defaultLayout .content {

    flex: 1;

}

#defaultLayout header {

    height: 80px;

    padding: 2rem 3rem;

    background-color: white;

    color: #212121;

    box-shadow: 1px 1px 2px rgba(0, 0, 0, 0.2);

    display: flex;

    justify-content: space-between;

    align-items: center;

}

#defaultLayout main {

    padding: 2rem;

}

.animated {

    -webkit-animation-duration: 0.3s;

    animation-duration: 0.3s;

    -webkit-animation-fill-mode: both;

    animation-fill-mode: both;

}

.fadeInDown {

    -webkit-animation-name: fadeInDown;

    animation-name: fadeInDown;

}

@keyframes fadeInDown {

    0% {

        opacity: 0;

        transform: translateY(-20px);

    }

    100% {

        opacity: 1;

        transform: translateY(0);

    }

}

Step 8: Implementing Back-end with Laravel

After implementing the front-end, we need to implement the back-end to handle requests for each screen and functionality. In this topic, we will address the creation of controllers, requests, routes, models, and resources for authentication and user management.

1. Creating the AuthController

Let’s create a controller to manage user authentication:

./vendor/bin/sail artisan make:controller Api/AuthController

Edit the file app/Http/Controllers/Api/AuthController.php with the following code:

<?php

namespace App\Http\Controllers\Api;

use App\Http\Controllers\Controller;

use App\Http\Requests\LoginRequest;

use App\Http\Requests\SignupRequest;

use App\Models\User;

use Illuminate\Http\Request;

use Illuminate\Support\Facades\Auth;

class AuthController extends Controller

{

    public function signup(SignupRequest $request)

    {

        $data = $request->validated();

        $user = User::create([

            'name' => $data['name'],

            'email' => $data['email'],

            'password' => bcrypt($data['password']),

        ]);

        $token = $user->createToken('main')->plainTextToken;

        return response(compact('user', 'token'));

    }

    public function login(LoginRequest $request)

    {

        $credentials = $request->validated();

        if (!Auth::attempt($credentials)) {

            return response(['message' => 'Provided email or password is incorrect'], 422);

        }

        $user = Auth::user();

        $token = $user->createToken('main')->plainTextToken;

        return response(compact('user', 'token'));

    }

    public function logout(Request $request)

    {

        $user = $request->user();

        $user->currentAccessToken()->delete();

        return response('', 204);

    }

}

2. Creating Login and Signup Requests

Requests are used to validate input data. Create the requests for login and signup:

./vendor/bin/sail artisan make:request SignupRequest
./vendor/bin/sail artisan make:request LoginRequest

Edit the generated files app/Http/Requests/LoginRequest.php and app/Http/Requests/SignupRequest.php:

LoginRequest.php

<?php

namespace App\Http\Requests;

use Illuminate\Foundation\Http\FormRequest;

class LoginRequest extends FormRequest

{

    public function authorize(): bool

    {

        return true;

    }

    public function rules(): array

    {

        return [

            'email' => 'required|email|string|exists:users,email',

            'password' => ['required']

        ];

    }

}

SignupRequest.php

<?php

namespace App\Http\Requests;

use Illuminate\Foundation\Http\FormRequest;

use Illuminate\Validation\Rules\Password;

class SignupRequest extends FormRequest

{

    public function authorize(): bool

    {

        return true;

    }

    public function rules(): array

    {

        return [

            'name' => ['required', 'string'],

            'email' => ['required', 'email', 'unique:users,email'],

            'password' => [

                'required',

                'confirmed',

                Password::min(8)->letters()->symbols()->numbers()

            ]

        ];

    }

}

3. Configuring Authentication Routes

Add the authentication routes in the routes/api.php file. In this file, we should implement each route to be requested as an axios request in the front-end:

<?php

use App\Http\Controllers\Api\AuthController;

use App\Http\Controllers\Api\UserController;

use Illuminate\Http\Request;

use Illuminate\Support\Facades\Route;

Route::middleware('auth:sanctum')->group(function () {

    Route::get('/user', function (Request $request) {

        return $request->user();

    });

    Route::post('/logout', [AuthController::class, 'logout']);

    Route::apiResource('/users', UserController::class);

});

Route::post('/signup', [AuthController::class, 'signup']);

Route::post('/login', [AuthController::class, 'login']);

4. Creating the UserController

Create a controller to manage users:

./vendor/bin/sail artisan make:controller Api/UserController --model=User --requests --resource --api

Edit the file app/Http/Controllers/Api/UserController.php with the following code:

<?php

namespace App\Http\Controllers\Api;

use App\Http\Controllers\Controller;

use App\Http\Requests\StoreUserRequest;

use App\Http\Requests\UpdateUserRequest;

use App\Http\Resources\UserResource;

use App\Models\User;

class UserController extends Controller

{

    public function index()

    {

        return UserResource::collection(User::query()->orderBy('id', 'desc')->paginate(10));

    }

    public function store(StoreUserRequest $request)

    {

        $data = $request->validated();

        $data['password'] = bcrypt($data['password']);

        $user = User::create($data);

        return response(new UserResource($user), 201);

    }

    public function show(User $user)

    {

        return new UserResource($user);

    }

    public function update(UpdateUserRequest $request, User $user)

    {

        $data = $request->validated();

        if (isset($data['password'])) {

            $data['password'] = bcrypt($data['password']);

        }

        $user->update($data);

        return new UserResource($user);

    }

    public function destroy(User $user)

    {

        $user->delete();

        return response('', 204);

    }

}

5. Creating Store and Update Requests

Requests are used to validate input data. Create requests to validate user data to be stored and updated via front-end requests:

StoreUserRequest.php

<?php

namespace App\Http\Requests;

use Illuminate\Foundation\Http\FormRequest;

use Illuminate\Validation\Rules\Password;

class StoreUserRequest extends FormRequest

{

    public function authorize(): bool

    {

        return true;

    }

    public function rules(): array

    {

        return [

            'name' => 'required|string|max:55',

            'email' => 'required|email|unique:users,email',

            'password' => [

                'required',

                Password::min(8)->letters()->symbols()

            ],

        ];

    }

}

UpdateUserRequest.php

<?php

namespace App\Http\Requests;

use Illuminate\Foundation\Http\FormRequest;

use Illuminate\Validation\Rules\Password;

class UpdateUserRequest extends FormRequest

{

    public function authorize(): bool

    {

        return true;

    }

    public function rules(): array

    {

        return [

            'name' => 'required|string|max:55',

            'email' => 'required|email|unique:users,email,' . $this->id,

            'password' => [

                'confirmed',

                Password::min(8)->letters()->symbols()

            ],

        ];

    }

}

6. Creating the UserResource

Create a resource to format the output of user data:

./vendor/bin/sail artisan make:resource UserResource

Edit the file app/Http/Resources/UserResource.php with the following code:

<?php

namespace App\Http\Resources;

use Illuminate\Http\Request;

use Illuminate\Http\Resources\Json\JsonResource;

class UserResource extends JsonResource

{

    public static $wrap = false;

    public function toArray(Request $request): array

    {

        return [

            'id' => $this->id,

            'name' => $this->name,

            'email' => $this->email,

            'created_at' => $this->created_at->format('Y-m-d H:i:s'),

        ];

    }

}

7. Creating the Database Seeder

Create a seeder to populate the database with test users:

./vendor/bin/sail artisan db:seed

Edit the file database/seeders/DatabaseSeeder.php with the following code:

<?php

namespace Database\Seeders;

use App\Models\User;

use Illuminate\Database\Seeder;

class DatabaseSeeder extends Seeder

{

    public function run(): void

    {

        User::factory(10)->create();

    }

}

8. Running Migrations and Seeders

Run the migrations and seeders to create tables in the database and populate them with test data:

./vendor/bin/sail artisan migrate --seed

Conclusion

Now you have a basic user management system with React, Laravel, using Docker, including authentication, creation, updating, displaying, and deleting users. This system can be expanded as needed to meet your project requirements.


#01 – Installing Laravel and React using Docker – Series: Creating a User Management System with Laravel, React, and Docker

Part 1: Installing Laravel and React using Docker

Welcome to the first part of our series where we will create a user management system using Laravel, React, and Docker! In this post, we will focus on the initial setup of our development environment, installing Laravel and React inside a Docker container. Let’s get started! Check repository.

Prerequisites

Before we begin with the installation of Laravel and React using Docker, you need to have Docker installed on your machine. We will show you how to install Docker Desktop, a user-friendly tool for managing your Docker containers.

Step 1: Downloading Docker Desktop

1. Visit the official Docker website.

2. Click on the “Download Docker Desktop” button.

3. Choose the appropriate version for your operating system (Windows, macOS, or Linux).

Step 2: Installing Docker Desktop

1. After downloading, open the installer and follow the on-screen instructions.

   For Windows: The installer will prompt you to enable WSL 2 (Windows Subsystem for Linux 2) integration, which is recommended for better performance.

   For macOS: Drag the Docker icon to the Applications folder.

   For Linux: Follow the specific installation instructions for your distribution (this usually involves adding the Docker repository and installing via the package manager).

2. After installation, open Docker Desktop. It may request additional permissions for setup and execution.

3. Verify the installation by opening a terminal and running the command:

   This command should display the Docker version installed, confirming that Docker is ready to use.

With Docker installed and running, we are ready to proceed with setting up our Laravel and React development environment.

Step 1: Creating the Laravel Project with Docker

First, let’s create a new Laravel project inside a Docker container. Open the terminal and run the following command:

This command downloads and sets up a new Laravel project named `crud-app` using Docker.

Step 2: Starting the Project with Docker

Now, let’s start the Docker environment for Laravel. In the terminal, navigate to the newly created project directory and run:

This command starts the Docker containers needed to run the Laravel project. From here, the Laravel project will be accessible at `http://localhost`.

Step 3: Preparing the Database

With the Docker environment running, let’s prepare the database by running the initial Laravel migrations. Still in the project directory, run:

This command applies all database migrations, creating the necessary tables to start working with Laravel.

Step 4: Creating the React Project

Now that the backend is set up, let’s create the frontend using React. In the root directory of the Laravel project, create a folder named `react` and navigate to it. Then, run the command to create the React project:

Follow the instructions to set up your new React project, choosing a name for the project and selecting React as the library to use.

Step 5: Installing React Dependencies

Inside the newly created React project directory, install the necessary dependencies with the following command:

Step 6: Running the React Application

Finally, to run the React development server, execute:

This will start the development server and your React application will be accessible at the address indicated in the terminal, usually `http://localhost:5173`.

That’s it! Now you have a Laravel project running on Docker and a React project set up inside the `react` directory of the Laravel project, ready for development. In the next part of this series, we will start integrating these two environments, creating an API in Laravel and connecting the React frontend. Stay tuned!

If you have any questions or suggestions, leave them in the comments below. See you next time!


Introduction to Laravel: A Comprehensive Guide for Beginners

Laravel is one of the most popular and widely used PHP frameworks in modern web development. With elegant and expressive syntax, it offers a refined development experience, simplifying common tasks such as routing, authentication, sessions, and caching. In this post, we will explore what Laravel is, its main features, and why it is an excellent choice for web developers of all levels.

What is Laravel?

Laravel is an open-source PHP framework created by Taylor Otwell. First released in 2011, Laravel was designed to make web development more accessible and efficient without sacrificing functionality. It follows the MVC (Model-View-Controller) pattern, which helps separate application logic from presentation, making the code more organized and easier to maintain.

Laravel’s Philosophy

Laravel’s philosophy is to provide a development experience that is enjoyable and creative. It adopts the best development practices and offers robust tools to help developers create high-quality applications with minimal frustration. The combination of clean and expressive code along with a rich collection of features makes Laravel a powerful and flexible framework.

Key Features of Laravel

Laravel comes with a range of features that make web development more efficient and enjoyable. Let’s explore some of the most notable ones:

1. Eloquent ORM

Eloquent ORM (Object-Relational Mapping) is one of Laravel’s jewels. It facilitates database interaction, allowing developers to work with database data intuitively. With Eloquent, you can perform complex queries using fluent and easy-to-understand syntax.

2. Simple and Powerful Routing

Laravel offers a simple and flexible routing system that allows you to define routes clearly and concisely. You can define routes directly in the routes file or use controllers for better organization.

3. Blade Templating Engine

Blade is Laravel’s templating engine, which allows you to create reusable layouts with clean and easy-to-use syntax. With Blade, you can use components, include partial views, and inherit layouts, making user interface construction more efficient.

4. Integrated Authentication System

Laravel comes with a ready-to-use authentication system that includes user registration, login, and password reset. This allows you to implement user authentication quickly and securely.

5. Middleware

Middleware are filters that you can apply to your routes to perform various checks and modifications on HTTP requests before they reach your application. Laravel makes it easy to create and use middleware for authentication, CSRF verification, and more.

6. Migrations and Seeding

Laravel provides an easy way to manage database schema through migrations. With migrations, you can version and control changes to the database schema safely and collaboratively.

7. Queues and Scheduled Tasks

Laravel has built-in support for queues and scheduled tasks, allowing you to run tasks in the background and schedule recurring tasks easily. This is useful for sending emails, processing file uploads, and other time-consuming tasks.

8. Artisan CLI

Artisan is Laravel’s command-line interface that offers a range of useful commands to speed up development. With Artisan, you can create controllers, models, and more with just one command.

Why Choose Laravel?

There are many PHP frameworks available, so why choose Laravel? Here are a few reasons:

1. Active Community and Support

Laravel has one of the most active communities in the PHP world. This means you have access to a vast amount of resources, including tutorials, packages, and community support. Laravel’s official documentation is extensive and well-written, making it easy to learn and troubleshoot issues.

2. Rapid Development

With its built-in tools and well-thought-out structure, Laravel allows developers to build applications quickly. Features like Eloquent ORM, Blade templating, and the integrated authentication system save a lot of development time.

3. Security

Laravel comes with several out-of-the-box security features, such as CSRF (Cross-Site Request Forgery) protection, SQL Injection prevention, and password encryption with bcrypt. This helps keep your applications secure without the need for much additional configuration.

4. Scalability

Whether for a small personal site or a large-scale enterprise application, Laravel is scalable. It supports the use of queues for long-running tasks and can be easily integrated with caching services like Redis and Memcached to improve performance.

5. Flexibility

Laravel is extremely flexible and can be used to build a variety of applications, from RESTful APIs to monolithic web applications. Its modular architecture allows you to use only the components you need, making it suitable for different types of projects.

Getting Started with Laravel

Now that you know the main features and benefits of Laravel, let’s take a look at the first steps to start developing with it.

1. Installation

To install Laravel, you need to have Composer installed on your machine. Composer is a dependency manager for PHP.

After installing Composer, you can install Laravel using the command below:

2. Project Structure

After installing Laravel, you will see a directory structure like this:

Each directory and file has a specific purpose. Here are some of the most important ones:

  • app/: Contains the main application code, including controllers, models, and middleware.
  • config/: Contains configuration files.
  • database/: Contains migrations, seeds, and the SQLite database if you choose to use it.
  • resources/: Contains views, language files, and assets like CSS and JavaScript.
  • routes/: Contains all route files.
  • storage/: Contains logs, caches, and other files generated by the application.
  • vendor/: Contains dependencies installed by Composer.

3. Initial Configuration

Before you start developing, you might want to configure some basic settings in the .env file at the root of the project. This file contains sensitive configurations such as database details, application key, and other environment-specific settings.

4. Development Server

Laravel comes with a built-in development server that you can use to test your application locally. To start the server, use the command:

This will start the server at http://localhost:8000 by default.

5. Creating a Route and a View

Let’s create a simple route and a view to see Laravel in action. Open the routes/web.php file and add the following route:

Now, create a file named hello.blade.php in the resources/views directory with the following content:

Access http://localhost:8000/hello in your browser, and you will see the message “Hello, Laravel!”.

Conclusion

Laravel is a powerful and versatile framework that can help transform your web development process. With its numerous features and active community, it is an excellent choice for both beginner and experienced developers. I hope this guide has provided a clear and useful introduction to Laravel and inspires you to explore more about this amazing framework. Happy coding!