#02 – Creating a User Management System with React and Axios – Series: Creating a User Management System with Laravel, React, and Docker

Part 2: Creating a User Management System with React and Axios
Introduction
In this tutorial, you will learn how to create a user management system using React for the front-end and Axios for communication with the back-end. We will cover creating routes, views, components, contexts, and configuring Axios. By the end, you will have a functional system with features for user login, registration, listing, editing, and deletion. Check repository.
Prerequisites
- Complete the steps of the first part of serie
Step 1: Project Setup
Installing Dependencies
First, create a new React project and install the necessary dependencies:
npm install axios react-router-domProject Structure
Organize your project as follows:
src/
|-- components/
|   |-- DefaultLayout.jsx
|   |-- GuestLayout.jsx
|
|-- contexts/
|   |-- ContextProvider.jsx
|
|-- views/
|   |-- Login.jsx
|   |-- NotFound.jsx
|   |-- SignUp.jsx
|   |-- UserForm.jsx
|   |-- Users.jsx
|
|-- router.jsx
|-- axios-client.js
|-- main.jsx
|-- index.css
Step 2: Context Setup
ContextProvider.jsx
Create a ContextProvider.jsx file inside the contexts folder to manage the application’s global state, including authenticated user and token.
import { createContext, useContext, useState } from "react";

const StateContext = createContext({

   token: null,

   user: null,

   notification: null,

   setToken: () => {},

   setUser: () => {},

   setNotification: () => {}

});

export const ContextProvider = ({ children }) => {

   const [user, setUser] = useState({});

   const [notification, _setNotification] = useState('');

   const [token, _setToken] = useState(localStorage.getItem('ACCESS_TOKEN'));

   const setToken = (token) => {

       _setToken(token);

       if (token) {

           localStorage.setItem('ACCESS_TOKEN', token);

       } else {

           localStorage.removeItem('ACCESS_TOKEN');

       }

   };

   const setNotification = message => {

       _setNotification(message);

       setTimeout(() => {

           _setNotification('');

       }, 5000);

   };

   return (

       <StateContext.Provider value={{ user, token, notification, setToken, setUser, setNotification }}>

           {children}

       </StateContext.Provider>

   );

};

export const useStateContext = () => useContext(StateContext);
Step 3: Axios Configuration
.env
Create a .env file to store environment variables, including the base URL (VITE_API_BASE_URL) for accessing the backend:
VITE_API_BASE_URL=http://localhostaxios-client.js
Create an axios-client.js file to configure Axios, including the base URL and interceptors to manage the authentication token.
import axios from "axios";

const axiosClient = axios.create({

   baseURL: `${import.meta.env.VITE_API_BASE_URL}/api`

});

axiosClient.interceptors.request.use((config) => {

   const token = localStorage.getItem('ACCESS_TOKEN');

   config.headers.Authorization = `Bearer ${token}`;

   return config;

});

axiosClient.interceptors.response.use((response) => {

   return response;

}, (error) => {

   const { response } = error;

   if (response.status === 401) {

       localStorage.removeItem('ACCESS_TOKEN');

   }

   throw error;

});

export default axiosClient;
Step 4: Layout Components Creation
DefaultLayout.jsx
Create a DefaultLayout.jsx file inside the components folder to define the default layout for protected pages.
import { Link, Navigate, Outlet } from "react-router-dom";
import { useStateContext } from "../contexts/ContextProvider";
import { useEffect } from "react";
import axiosClient from "../axios-client";
export default function DefaultLayout() {
const { token, user, setUser, setToken, notification } = useStateContext();
if (!token) {
return <Navigate to={'/login'} />
}
const onLogout = (e) => {
e.preventDefault();
axiosClient.post('/logout')
.then(() => {
setUser({});
setToken(null);
});
};
useEffect(() => {
axiosClient.get('/user')
.then(({ data }) => {
setUser(data);
});
}, []);
return (
<div id="defaultLayout">
<aside>
<Link to="/dashboard">Dashboard</Link>
<Link to="/users">Users</Link>
</aside>
<div className="content">
<header>
<div>Header</div>
<div>
{user.name}
<a onClick={onLogout} className="btn-logout" href="#">Logout</a>
</div>
</header>
<main>
<Outlet/>
</main>
{notification &&
<div className="notification">
{notification}
</div>
}
</div>
</div>
);
}GuestLayout.jsx
Create a GuestLayout.jsx file inside the components folder to define the layout for public pages.
import { Navigate, Outlet } from "react-router-dom";

import { useStateContext } from "../contexts/ContextProvider";

export default function GuestLayout() {

   const { token } = useStateContext();

   if (token) {

       return <Navigate to={'/'} />

   }

   return (

       <>

           <Outlet />

       </>

   );

}
Step 5: Views Creation
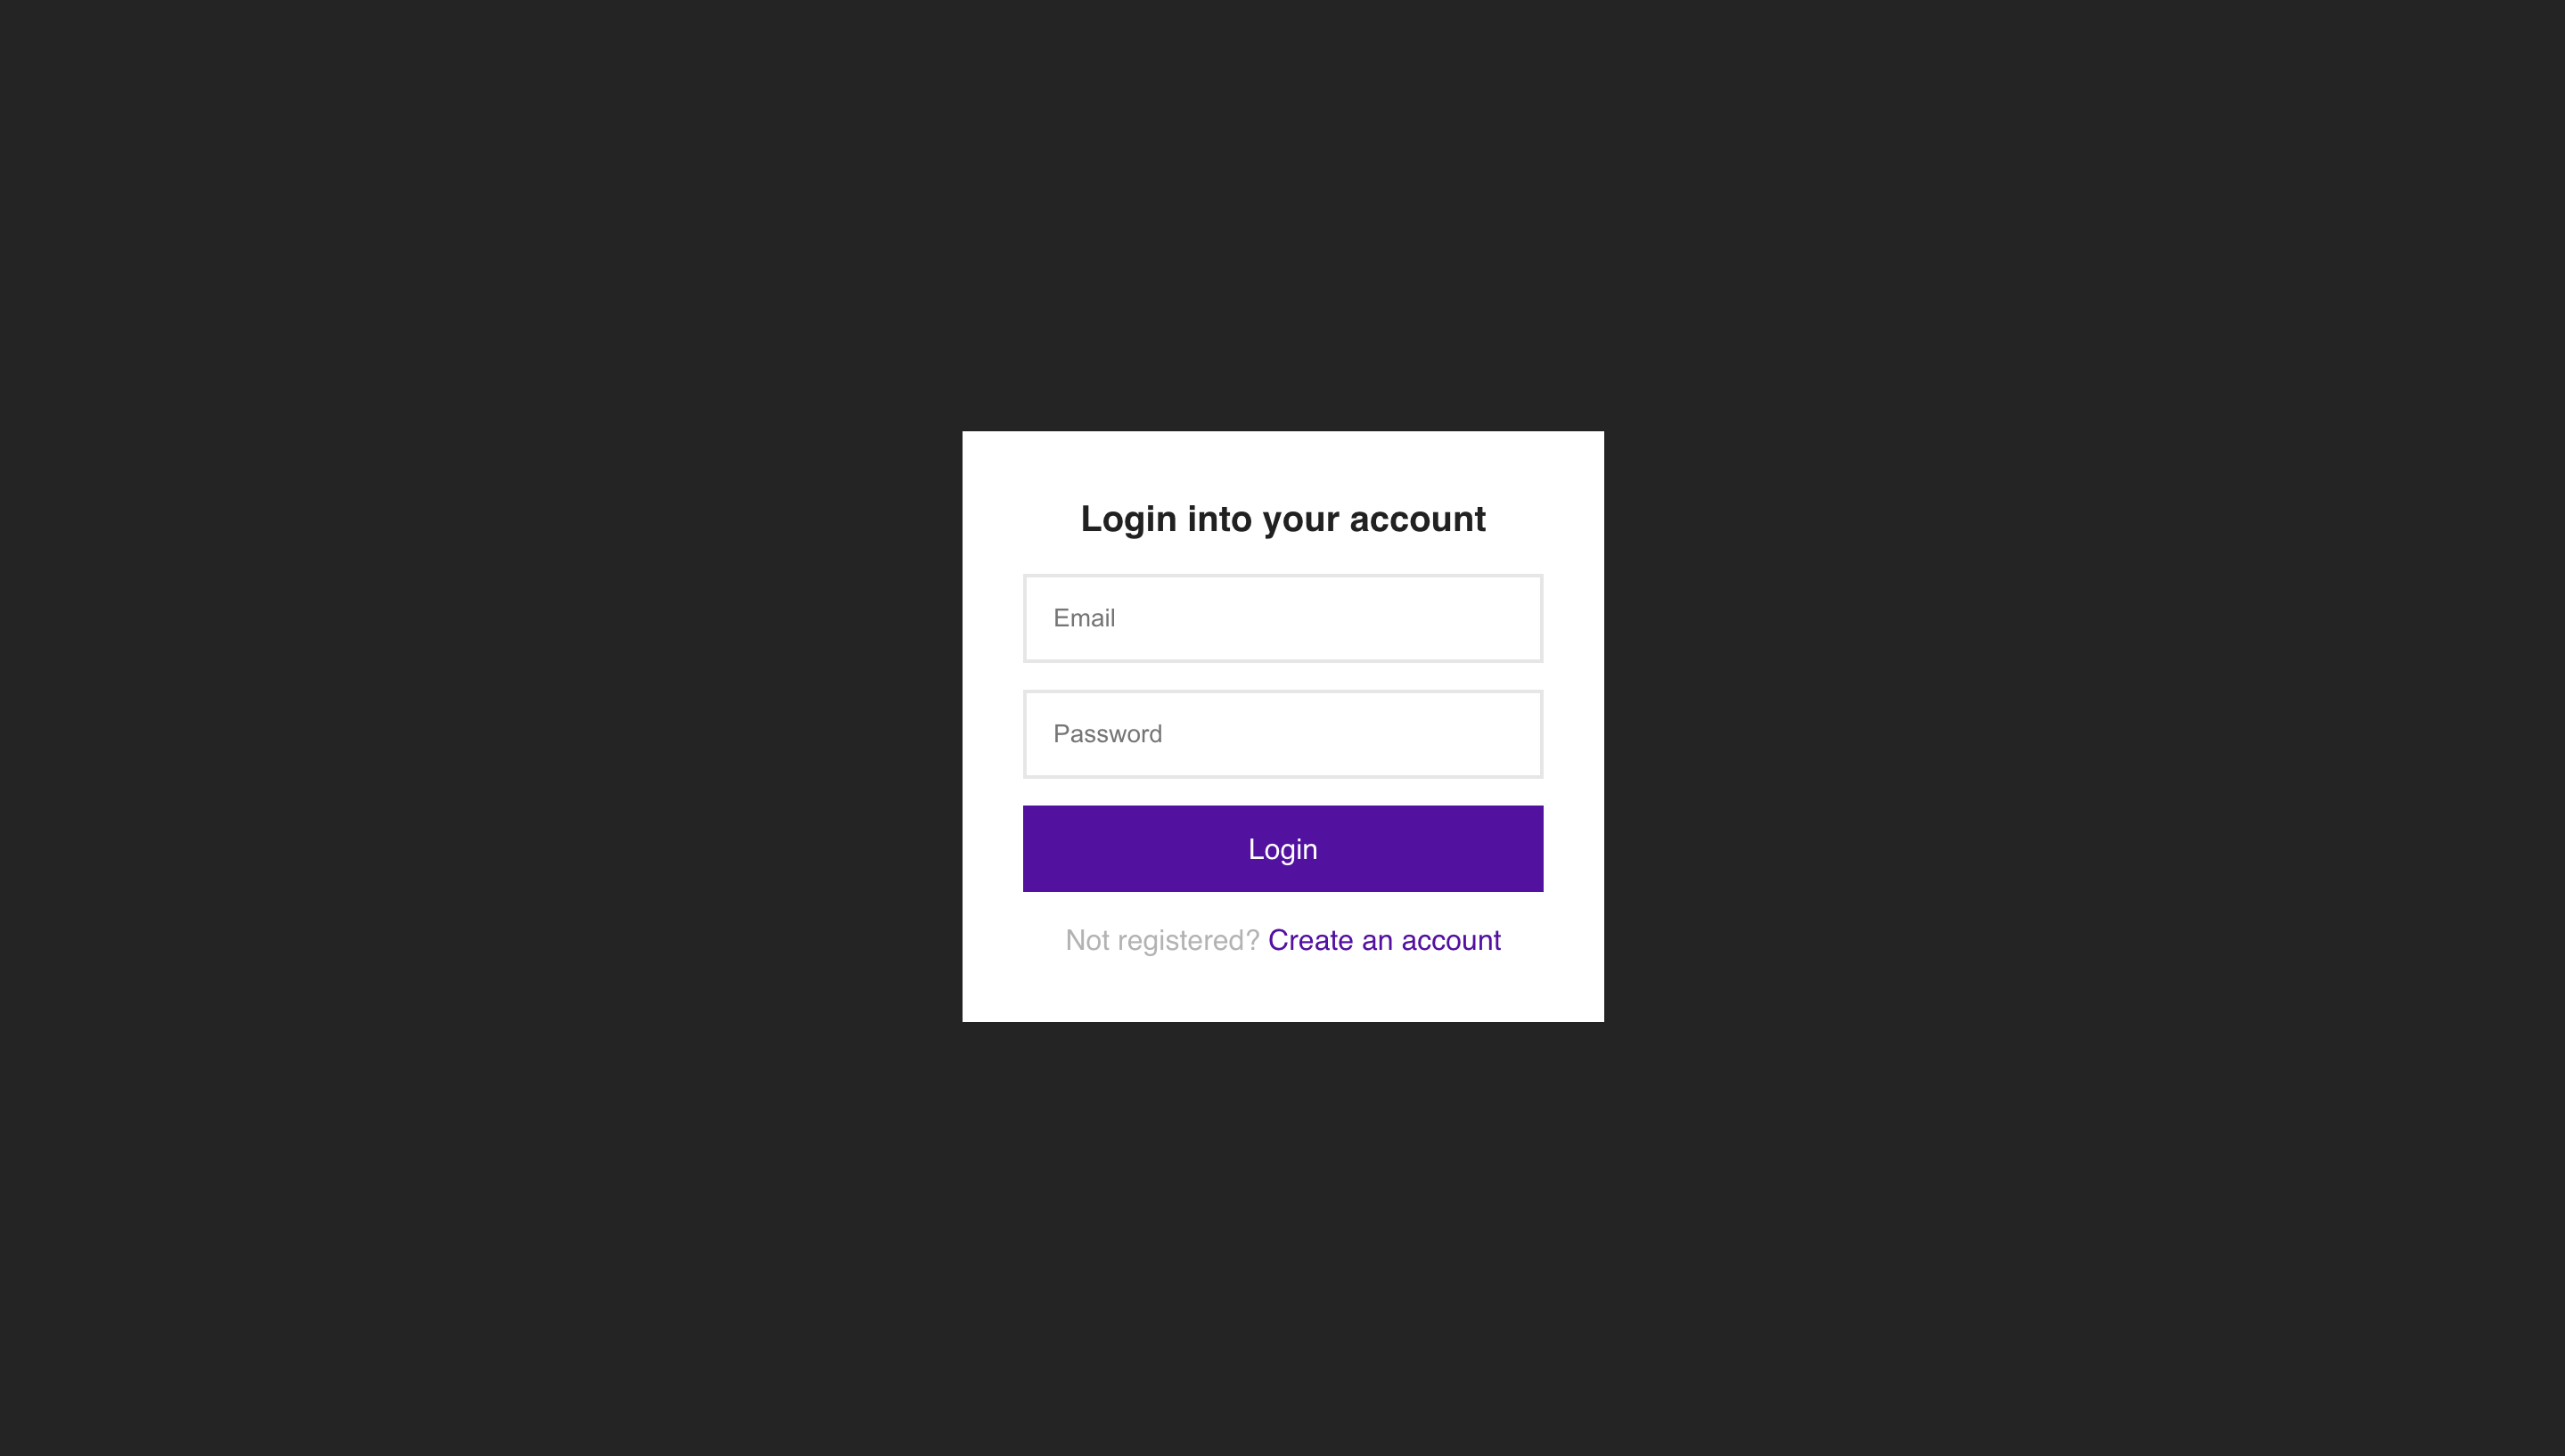
Login.jsx
Create a Login.jsx file inside the views folder for the login page.
import { useRef, useState } from "react";

import { Link } from "react-router-dom";

import axiosClient from "../axios-client";

import { useStateContext } from "../contexts/ContextProvider";

export default function Login() {

   const [errors, setErrors] = useState(``);

   const emailRef = useRef();

   const passwordRef = useRef();

   const { setUser, setToken } = useStateContext();

   const onSubmit = (e) => {

       e.preventDefault();

       const payload = {

           email: emailRef.current.value,

           password: passwordRef.current.value,

       };

       axiosClient.post('/login', payload)

       .then(({ data }) => {

           setUser(data.user);

           setToken(data.token);

       })

       .catch(err => {

           const response = err.response;

           if (response && response.status === 422) {

               if (response.data.errors) {

                   setErrors(response.data.errors);

               } else {

                   setErrors({ email: [response.data.message] });

               }

           }

       });

   };

   return (

       <div className="login-signup-form animated fadeInDown">

           <div className="form">

               <form onSubmit={onSubmit}>

                   <h1 className="title">Login into your account</h1>

                   {errors &&

                       <div className="alert">

                           {Object.keys(errors).map(key => (

                               <p key={key}>{errors[key][0]}</p>

                           ))}

                       </div>

                   }

                   <input ref={emailRef} type="email" placeholder="Email" />

                   <input ref={passwordRef} type="password" placeholder="Password" />

                   <button className="btn btn-block">Login</button>

                   <p className="message">Not registered? <Link to="/signup">Create an account</Link></p>

               </form>

           </div>

       </div>

   );

}
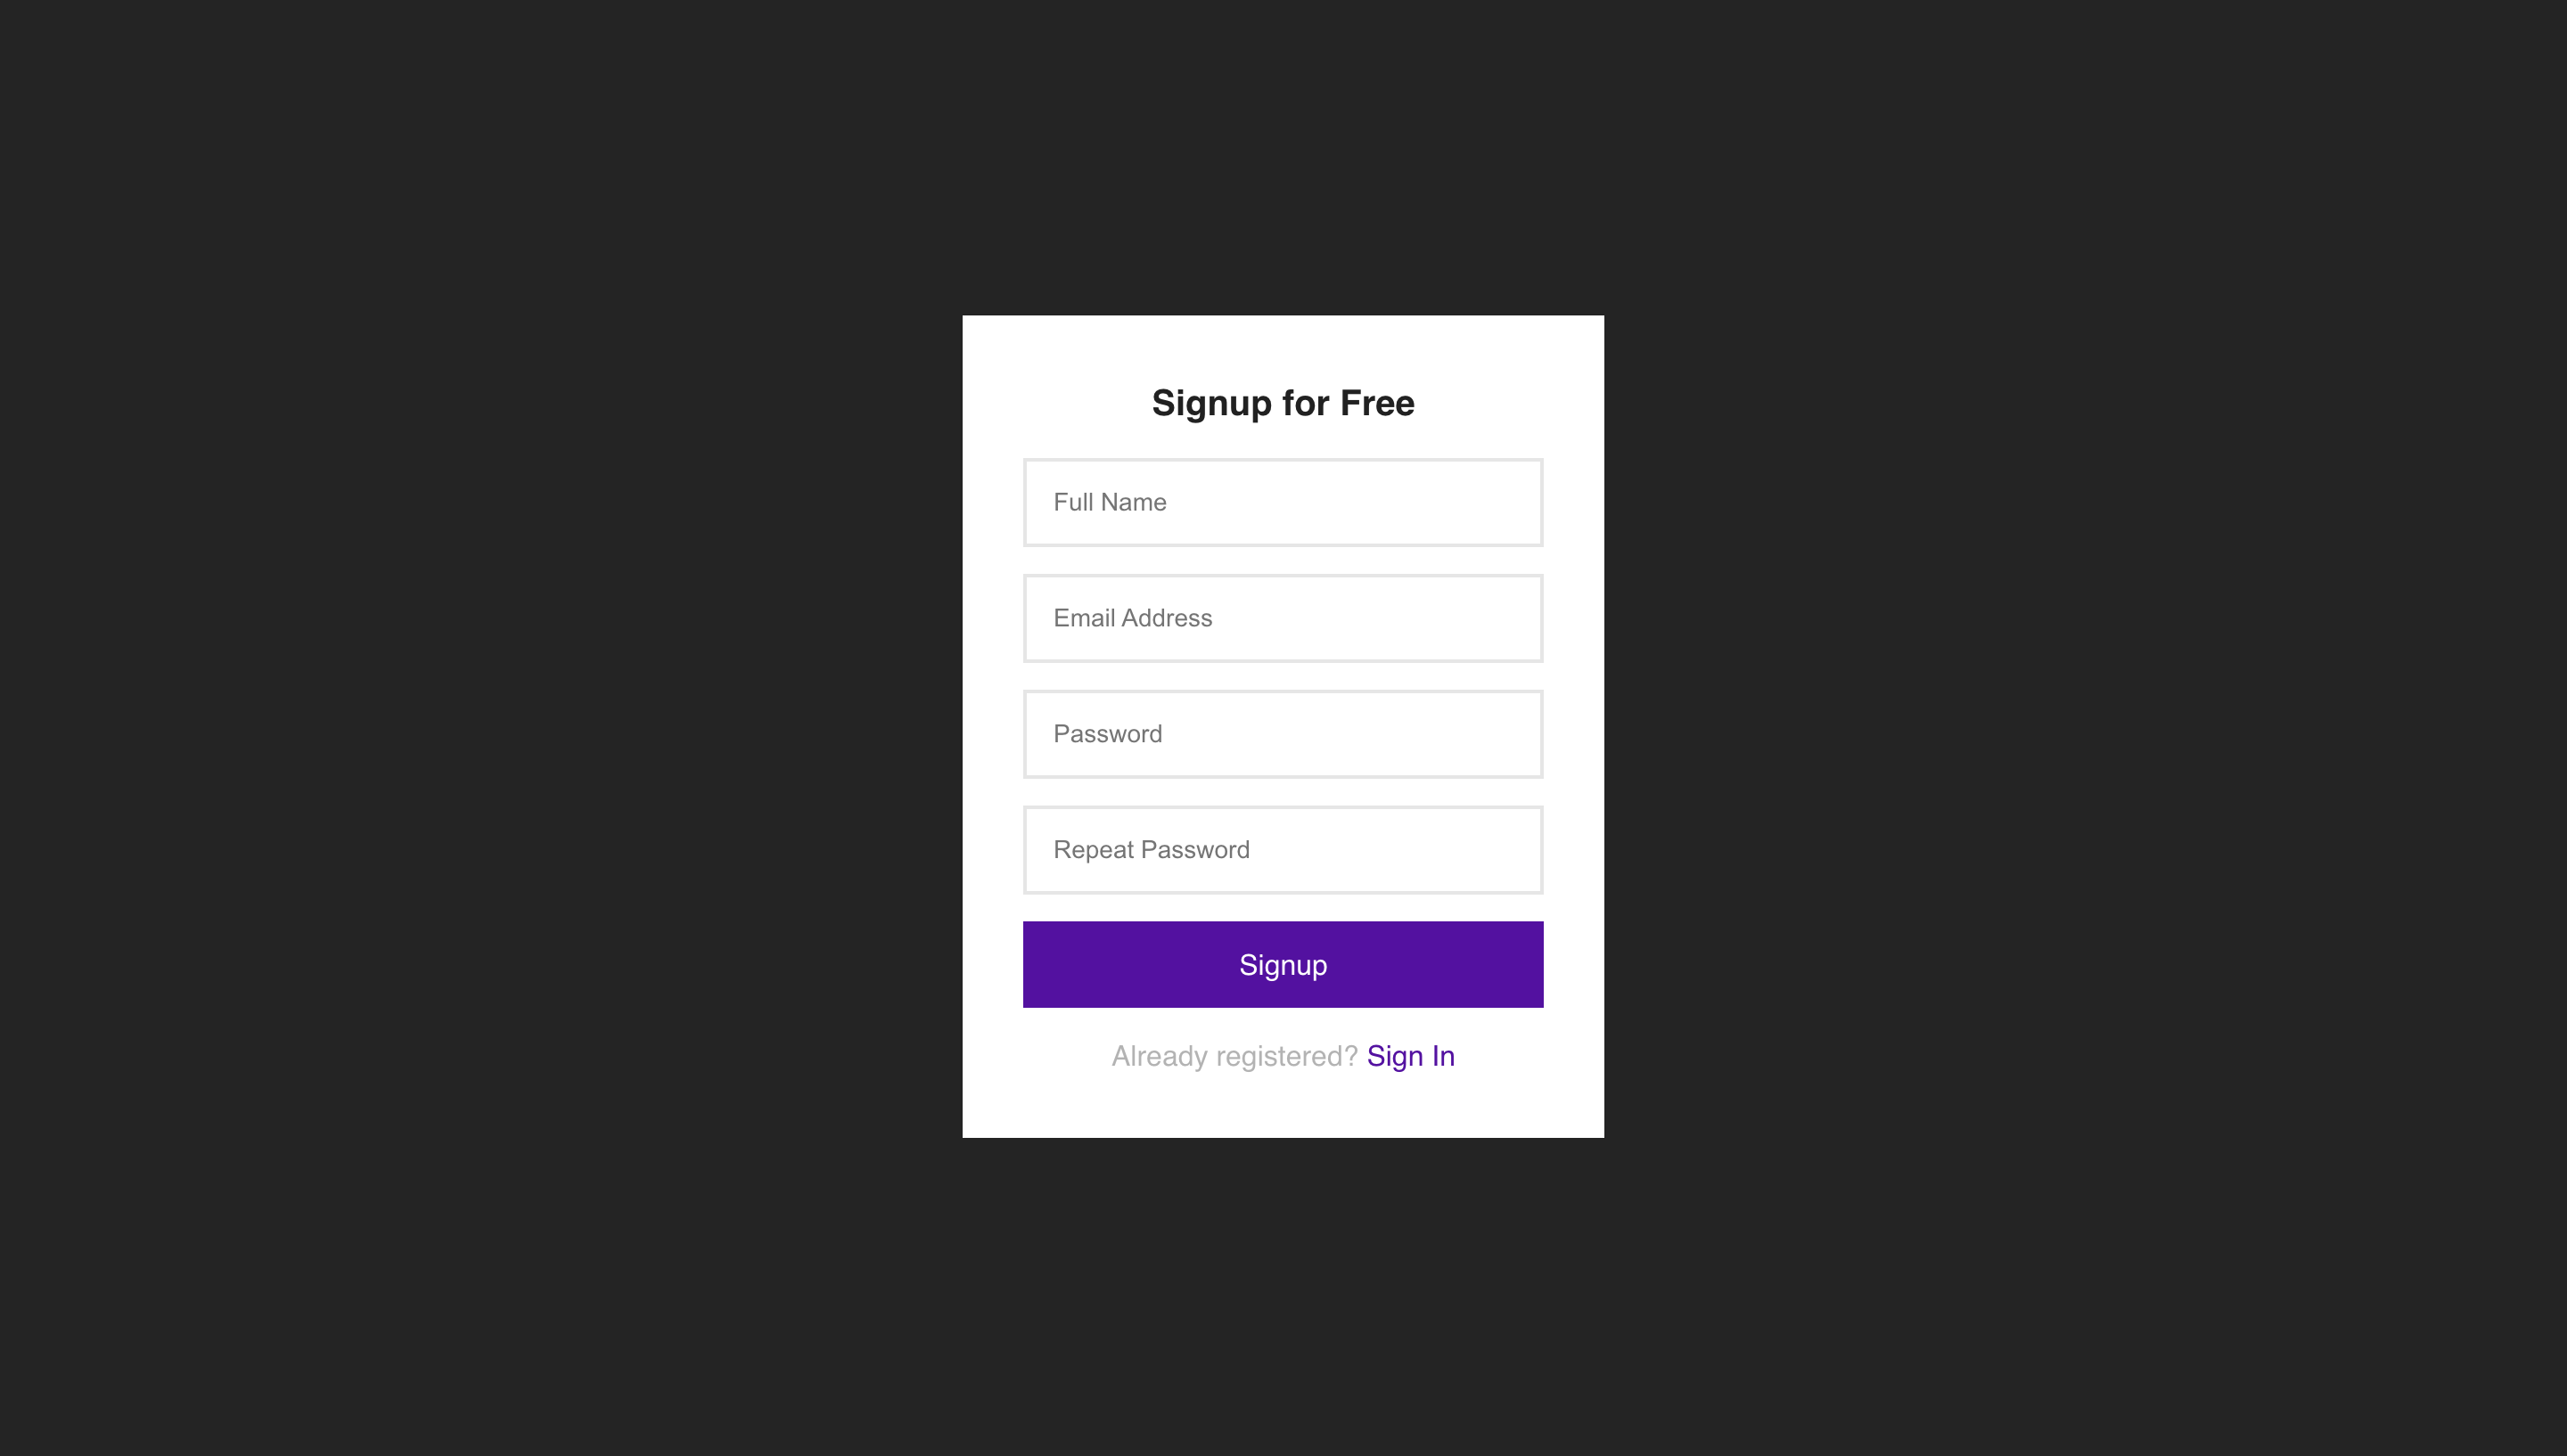
SignUp.jsx
Create a SignUp.jsx file inside the views folder for the signup page.
import { useRef, useState } from "react";

import { Link } from "react-router-dom";

import axiosClient from "../axios-client";

import { useStateContext } from "../contexts/ContextProvider";

export default function SignUp() {

   const nameRef = useRef();

   const emailRef = useRef();

   const passwordRef = useRef();

   const passwordConfirmationRef = useRef();

   const [errors, setErrors] = useState(null);

   const { setUser, setToken } = useStateContext();

   const onSubmit = (e) => {

       e.preventDefault();

       const payload = {

           name: nameRef.current.value,

           email: emailRef.current.value,

           password: passwordRef.current.value,

           password_confirmation: passwordConfirmationRef.current.value,

       };

       axiosClient.post('/signup', payload)

       .then(({ data }) => {

           setUser(data.user);

           setToken(data.token);

       })

       .catch(err => {

           const response = err.response;

           if (response && response.status === 422) {

               setErrors(response.data.errors);

           }

       });

   };

   return (

       <div className="login-signup-form animated fadeInDown">

           <div className="form">

               <form onSubmit={onSubmit}>

                   <h1 className="title">Signup for Free</h1>

                   {errors &&

                       <div className="alert">

                           {Object.keys(errors).map(key => (

                               <p key={key}>{errors[key][0]}</p>

                           ))}

                       </div>

                   }

                   <input ref={nameRef} type="text" placeholder="Full Name" />

                   <input ref={emailRef} type="email" placeholder="Email" />

                   <input ref={passwordRef} type="password" placeholder="Password" />

                   <input ref={passwordConfirmationRef} type="password" placeholder="Password Confirmation" />

                   <button className="btn btn-block">Signup</button>

                   <p className="message">Already Registered? <Link to="/login">Sign in</Link></p>

               </form>

           </div>

       </div>

   );

}
Users.jsx
Create a Users.jsx file inside the views folder for the users list page.
import { useEffect, useState } from "react";
import axiosClient from "../axios-client";
import { Link } from "react-router-dom";
import { useStateContext } from "../contexts/ContextProvider";
export default function Users() {
const [users, setUsers] = useState([]);
const [loading, setLoading] = useState(false);
const { setNotification } = useStateContext();
useEffect(() => {
getUsers();
}, []);
const getUsers = () => {
setLoading(true);
axiosClient.get('/users')
.then(({ data }) => {
setLoading(false);
setUsers(data.data);
})
.catch(() => {
setLoading(false);
});
};
const onDelete = (u) => {
if (!window.confirm("Are you sure you want to delete this user?")) {
return;
}
axiosClient.delete(`/users/${u.id}`)
.then(() => {
setNotification('User was successfully deleted');
getUsers();
});
};
return (
<div>
<div style={{ display: 'flex', justifyContent: 'space-between', alignItems: 'center' }}>
<h1>Users</h1>
<Link className="btn-add" to="/users/new">Add new</Link>
</div>
<div className="card animated fadeInDown">
<table>
<thead>
<tr>
<th>ID</th>
<th>Name</th>
<th>Email</th>
<th>Created Date</th>
<th>Actions</th>
</tr>
</thead>
{loading &&
<tbody>
<tr>
<td colSpan="5" className="text-center">
Loading...
</td>
</tr>
</tbody>
}
{!loading &&
<tbody>
{users.map(u => (
<tr key={u.id}>
<td>{u.id}</td>
<td>{u.name}</td>
<td>{u.email}</td>
<td>{u.created_at}</td>
<td>
<Link className="btn-edit" to={'/users/' + u.id}>Edit</Link>
<button className="btn-delete" onClick={ev => onDelete(u)}>Delete</button>
</td>
</tr>
))}
</tbody>
}
</table>
</div>
</div>
);
}
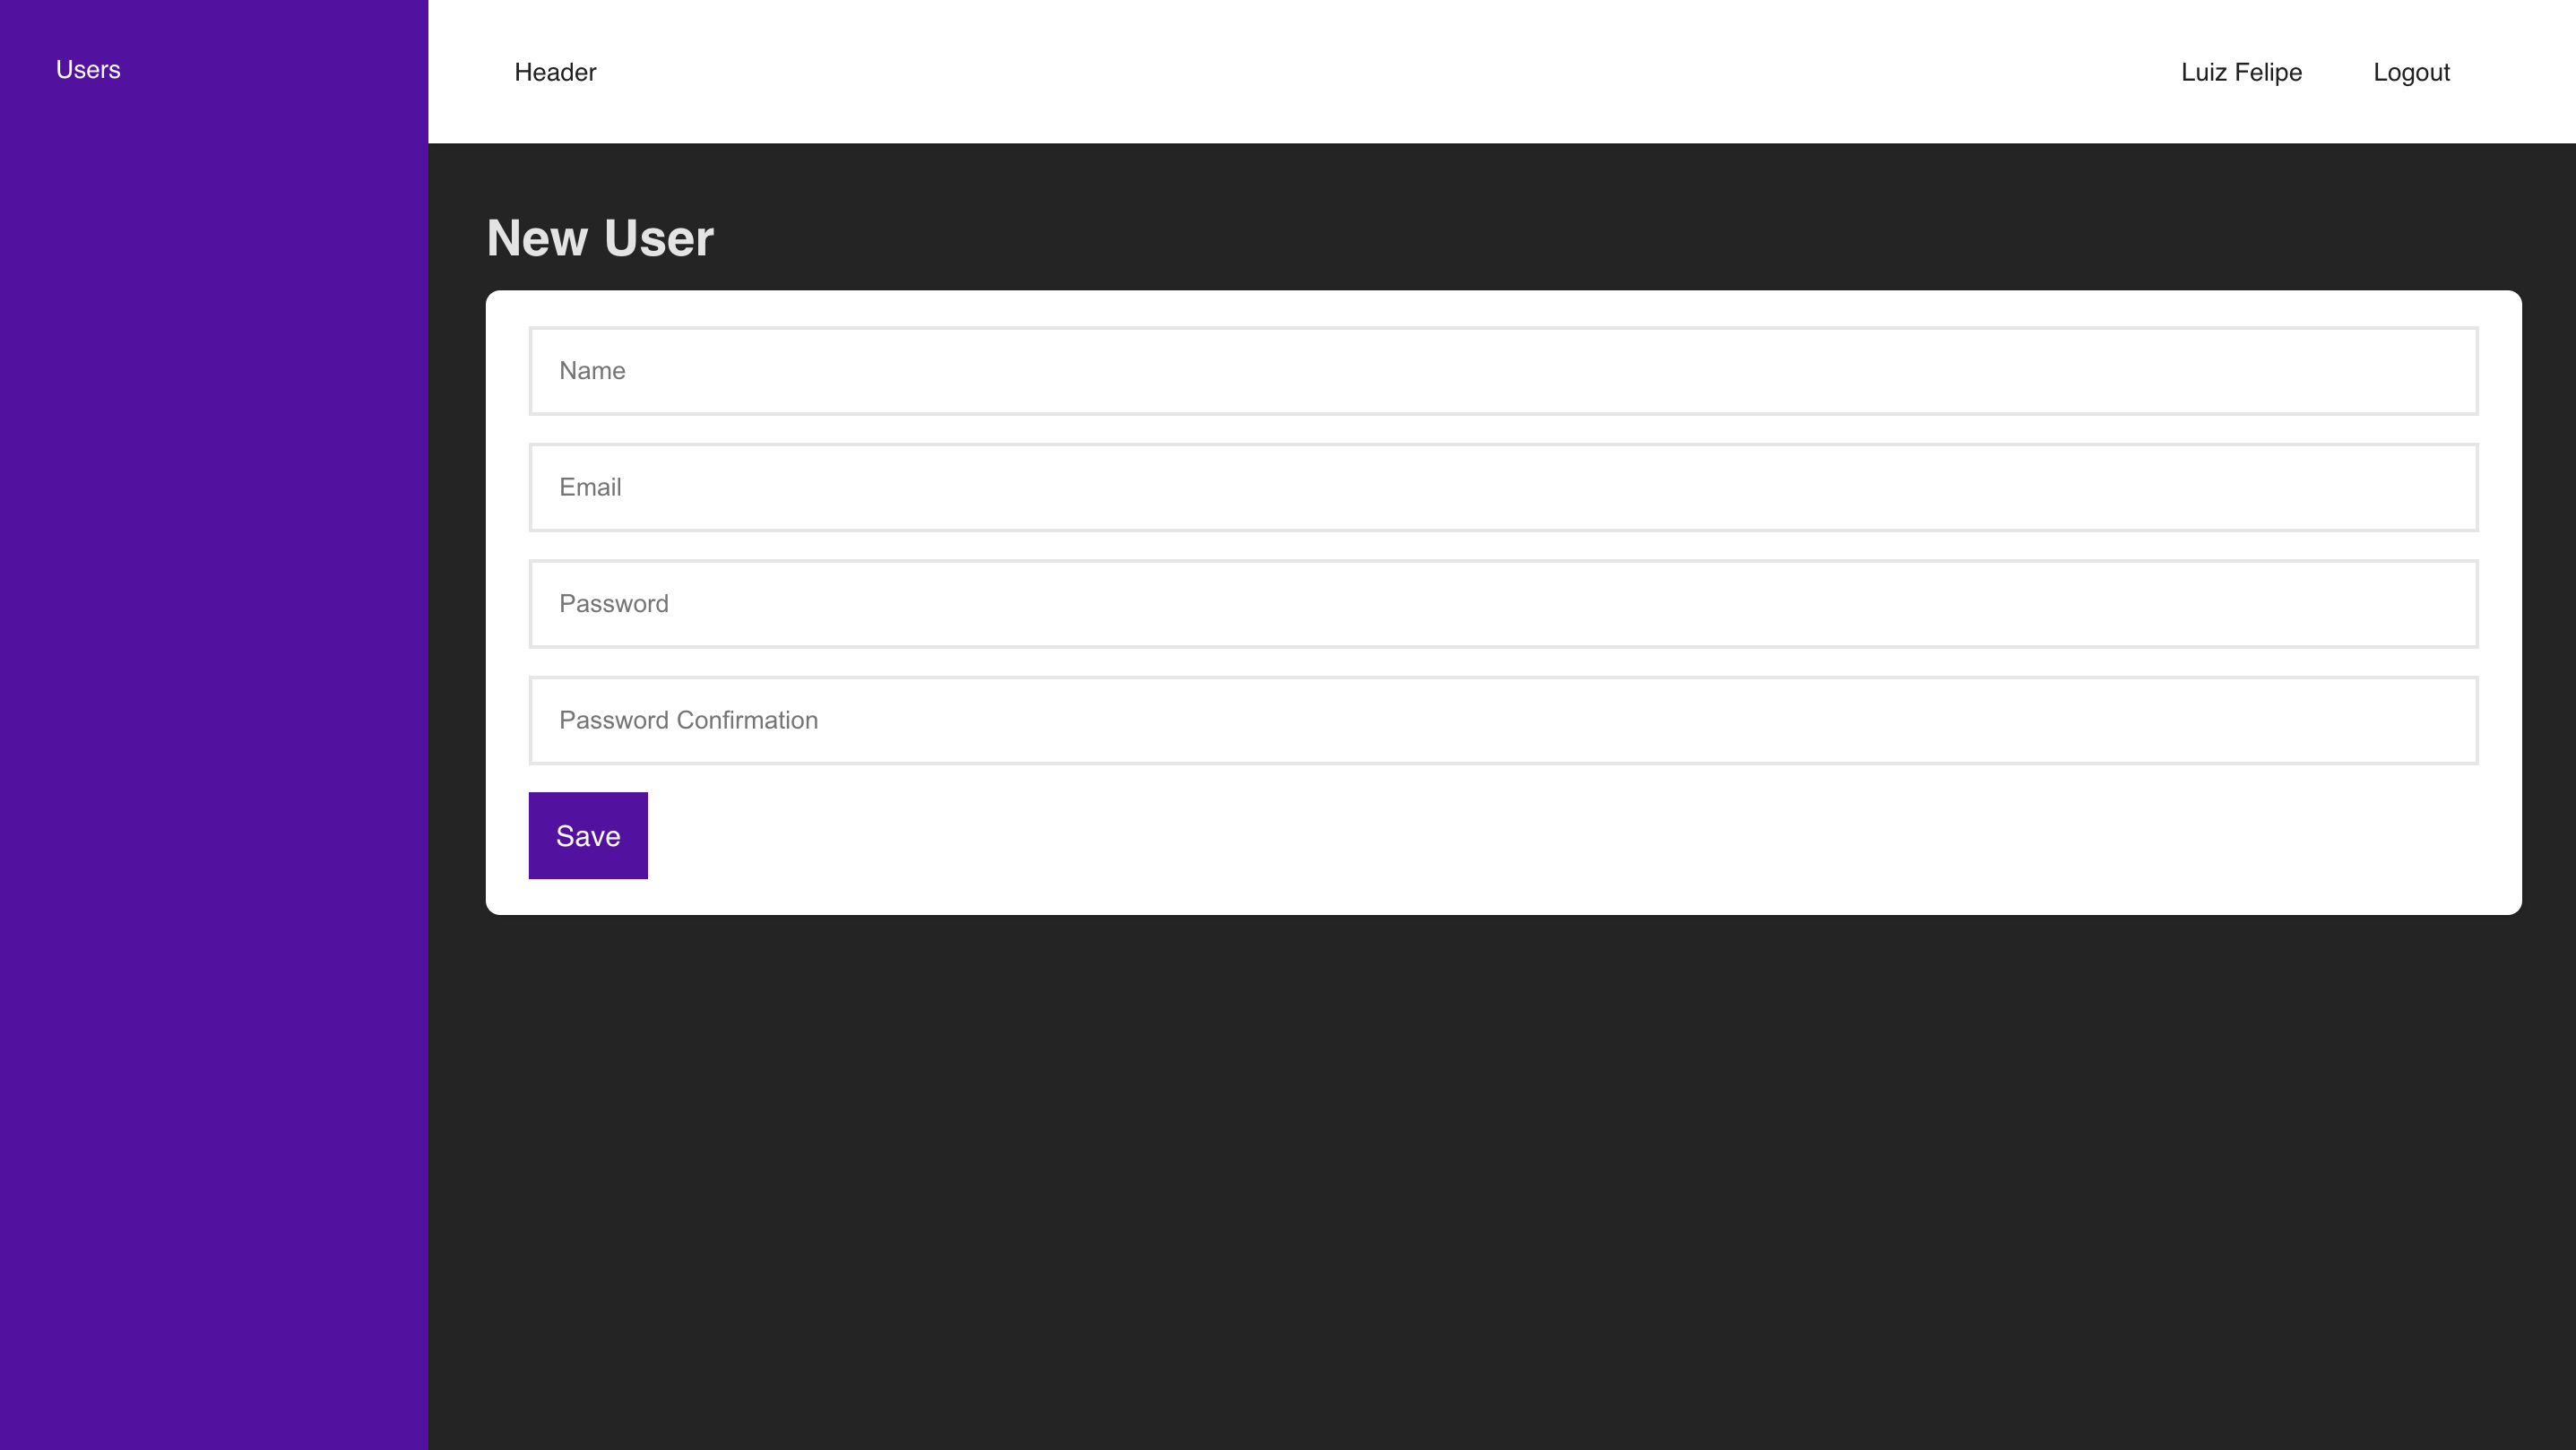
UserForm.jsx
Create a UserForm.jsx file inside the views folder for the user creation and update form.
import { useNavigate, useParams } from "react-router-dom";

import { useEffect, useState } from "react";

import axiosClient from "../axios-client";

import { useStateContext } from "../contexts/ContextProvider";

export default function UserForm() {

   const { id } = useParams();

   const navigate = useNavigate();

   const [loading, setLoading] = useState(false);

   const [errors, setErrors] = useState(null);

   const { setNotification } = useStateContext();

   const [user, setUser] = useState({

       id: null,

       name: '',

       email: '',

       password: '',

       password_confirmation: ''

   });

   if (id) {

       useEffect(() => {

           setLoading(true);

           axiosClient.get(`/users/${id}`)

           .then(({ data }) => {

               setLoading(false);

               setUser(data);

           })

           .catch(() => {

               setLoading(false);

           });

       }, []);

   }

   const onSubmit = (e) => {

       e.preventDefault();

       if (user.id) {

           axiosClient.put(`/users/${user.id}`, user)

           .then(() => {

               setNotification('User was successfully updated');

               navigate('/users');

           })

           .catch(err => {

               const response = err.response;

               if (response && response.status === 422) {

                   setErrors(response.data.errors);

               }

           });

       } else {

           axiosClient.post(`/users`, user)

           .then(() => {

               setNotification('User was successfully created');

               navigate('/users');

           })

           .catch(err => {

               const response = err.response;

               if (response && response.status === 422) {

                   setErrors(response.data.errors);

               }

           });

       }

   };

   return (

       <>

           {user.id && <h1>Update User: {user.name}</h1>}

           {!user.id && <h1>New User</h1>}

           <div className="card animated fadeInDown">

               {loading && (

                   <div className="text-center">

                       Loading...

                   </div>

               )}

               {errors && (

                   <div className="alert">

                       {Object.keys(errors).map(key => (

                           <p key={key}>{errors[key][0]}</p>

                       ))}

                   </div>

               )}

               {!loading && (

                   <form onSubmit={onSubmit}>

                       <input value={user.name} onChange={e => setUser({...user, name: e.target.value})} placeholder="Name" />

                       <input value={user.email} onChange={e => setUser({...user, email: e.target.value})} placeholder="Email" />

                       <input type="password" onChange={e => setUser({...user, password: e.target.value})} placeholder="Password" />

                       <input type="password" onChange={e => setUser({...user, password_confirmation: e.target.value})} placeholder="Password Confirmation" />

                       <button className="btn">Save</button>

                   </form>

               )}

           </div>

       </>

   );

}
NotFound.jsx
Create a NotFound.jsx file inside the views folder for the 404 error page.
export default function NotFound() {

    return(

        <div className="container">

            <p className="text-center">404 - Not Found</p>

        </div>

    );

}
Step 6: Routing
router.jsx
Create a router.jsx file to define the application routes using react-router-dom.
import { createBrowserRouter, Navigate } from "react-router-dom";

import Login from "./views/Login";

import SignUp from "./views/SignUp";

import Users from "./views/Users";

import NotFound from "./views/NotFound";

import UserForm from "./views/UserForm";

import DefaultLayout from "./components/DefaultLayout";

import GuestLayout from "./components/GuestLayout";

const router = createBrowserRouter([

   {

       path: '/',

       element: <DefaultLayout />,

       children: [

           {

               path: '/',

               element: <Navigate to="/users" />

           },

           {

               path: '/users',

               element: <Users />

           },

           {

               path: '/users/new',

               element: <UserForm key="userCreate" />

           },

           {

               path: '/users/:id',

               element: <UserForm key="userUpdate" />

           }

       ]

   },

   {

       path: '/',

       element: <GuestLayout />,

       children: [

           {

               path: '/login',

               element: <Login />

           },

           {

               path: '/signup',

               element: <SignUp />

           }

       ]

   },

   {

       path: '*',

       element: <NotFound />

   }

]);

export default router;
Step 7: Initialization of the Application
main.jsx
Configure the main.jsx file to initialize the application, provide routes for the pages, and manage user and token information via context for the system.
import React from 'react';

import ReactDOM from 'react-dom/client';

import { RouterProvider } from 'react-router-dom';

import { ContextProvider } from './contexts/ContextProvider';

import router from './router';

import './index.css';

ReactDOM.createRoot(document.getElementById('root')).render(

   <React.StrictMode>

       <ContextProvider>

           <RouterProvider router={router} />

       </ContextProvider>

   </React.StrictMode>,

);
index.css
Add basic application styles to the index.css file.
:root {

  font-family: Inter, system-ui, Avenir, Helvetica, Arial, sans-serif;

  line-height: 1.5;

  font-weight: 400;

  color-scheme: light dark;

  color: rgba(255, 255, 255, 0.87);

  background-color: #242424;

  font-synthesis: none;

  text-rendering: optimizeLegibility;

  -webkit-font-smoothing: antialiased;

  -moz-osx-font-smoothing: grayscale;

}

@import url('https://fonts.googleapis.com/css2?family=Open+Sans:ital,wght@0,300;0,400;0,500;0,600;0,700;0,800;1,300;1,400;1,500;1,600;1,700;1,800&display=swap');

* {

    box-sizing: border-box;

}

html, body, #root, #defaultLayout, #guestLayout {

    min-height: 100vh;

}

h1, h2, h3, h4, h5, h6, p {

    margin: 0;

}

body {

    font-family: 'Open Sans', sans-serif;

    margin: 0;

    padding: 0;

    font-size: 14px;

}

input {

    outline: 0;

    background: #ffffff;

    color: #212121;

    width: 100%;

    border: 2px solid #e6e6e6;

    margin: 0 0 15px;

    padding: 15px;

    box-sizing: border-box;

    font-size: 14px;

    transition: all 0.3s;

}

input:focus {

    border-color: #5b08a7;

}

.container {

    display: flex;

    align-items: center;

    justify-content: center;

    height: 100vh;

    font-size: 1.2rem;

}

.btn,

.btn-add,

.btn-edit,

.btn-delete {

    font-family: "Roboto", sans-serif;

    outline: 0;

    background: #5b08a7;

    border: 0;

    text-decoration: none;

    padding: 15px;

    color: #FFFFFF;

    font-size: 16px;

    -webkit-transition: all 0.3 ease;

    transition: all 0.3 ease;

    cursor: pointer;

}

.btn-block {

    width: 100%;

}

.btn-add,

.btn-edit,

.btn-delete{

    padding: 0.5rem 0.75rem;

    font-size: 14px;

    border-radius: 4px;

}

.btn-add {

    background-color: #00a762;

}

.btn-delete {

    background-color: #b72424;

}

.btn-logout {

    text-decoration: none;

    padding: 0.75rem 1.5rem;

    color: #212121;

    transition: all 0.3s;

    border-radius: 6px;

}

.btn-logout:hover {

    background-color: rgba(0, 0, 0, 0.1);

}

.btn:hover,

.btn:active,

.btn:focus {

    background: #5b08a7;

}

.text-center {

    text-align: center;

}

table {

    width: 100%;

    border-spacing: 0;

    border-collapse: collapse;

}

table > thead > tr > th {

    text-align: left;

    padding: 0.5rem 0.5rem;

    background-color: #efefef;

    color: #212121;

}

table > tbody > tr > td {

    padding: 0.5rem 0.5rem;

    border-bottom: 1px solid #efefef;

    white-space: nowrap;

    color: #212121;

}

.card {

    background-color: #FFF;

    border-radius: 0.5rem;

    box-shadow: 1px 1px 3px rgba(0, 0, 0, 0.1);

    padding: 1.25rem 1.5rem;

    margin-bottom: 1rem;

    margin-top: 0.5rem;

}

.alert {

    padding: 1rem;

    background-color: #ff4040;

    color: white;

    border-radius: 0.5rem;

    margin-bottom: 1rem;

}

.notification {

    position: fixed;

    right: 1rem;

    bottom: 1rem;

    z-index: 100;

    padding: 1rem 1.5rem;

    background-color: #00a762;

    color: white;

    border-radius: 0.5rem;

}

/* Login/Signup forms*/

.login-signup-form {

    height: 100vh;

    display: flex;

    justify-content: center;

    align-items: center;

}

.login-signup-form .form {

    width: 360px;

    position: relative;

    z-index: 1;

    background: #FFFFFF;

    max-width: 360px;

    padding: 34px;

    box-shadow: 0 0 2px 0 rgba(0, 0, 0, 0.1);

}

.login-signup-form .title {

    font-size: 20px;

    margin-bottom: 1rem;

    text-align: center;

    color: #212121;

}

.login-signup-form .form .message {

    margin: 15px 0 0;

    color: #b3b3b3;

    font-size: 16px;

    text-align: center;

}

.login-signup-form .form .message a {

    color: #5b08a7;

    text-decoration: none;

}

/* Login/Signup form */

#defaultLayout {

    display: flex;

}

#defaultLayout aside {

    width: 240px;

    background-color: #5b08a7;

    padding: 1rem

}

#defaultLayout aside > a {

    display: block;

    padding: 0.75rem 1rem;

    border-radius: 6px;

    color: white;

    text-decoration: none;

    transition: all 0.2s;

}

#defaultLayout aside > a:hover {

    background-color: rgba(0, 0, 0, 0.2);

}

#defaultLayout .content {

    flex: 1;

}

#defaultLayout header {

    height: 80px;

    padding: 2rem 3rem;

    background-color: white;

    color: #212121;

    box-shadow: 1px 1px 2px rgba(0, 0, 0, 0.2);

    display: flex;

    justify-content: space-between;

    align-items: center;

}

#defaultLayout main {

    padding: 2rem;

}

.animated {

    -webkit-animation-duration: 0.3s;

    animation-duration: 0.3s;

    -webkit-animation-fill-mode: both;

    animation-fill-mode: both;

}

.fadeInDown {

    -webkit-animation-name: fadeInDown;

    animation-name: fadeInDown;

}

@keyframes fadeInDown {

    0% {

        opacity: 0;

        transform: translateY(-20px);

    }

    100% {

        opacity: 1;

        transform: translateY(0);

    }

}
Step 8: Implementing Back-end with Laravel
After implementing the front-end, we need to implement the back-end to handle requests for each screen and functionality. In this topic, we will address the creation of controllers, requests, routes, models, and resources for authentication and user management.
1. Creating the AuthController
Let’s create a controller to manage user authentication:
./vendor/bin/sail artisan make:controller Api/AuthControllerEdit the file app/Http/Controllers/Api/AuthController.php with the following code:
<?php

namespace App\Http\Controllers\Api;

use App\Http\Controllers\Controller;

use App\Http\Requests\LoginRequest;

use App\Http\Requests\SignupRequest;

use App\Models\User;

use Illuminate\Http\Request;

use Illuminate\Support\Facades\Auth;

class AuthController extends Controller

{

    public function signup(SignupRequest $request)

    {

        $data = $request->validated();

        $user = User::create([

            'name' => $data['name'],

            'email' => $data['email'],

            'password' => bcrypt($data['password']),

        ]);

        $token = $user->createToken('main')->plainTextToken;

        return response(compact('user', 'token'));

    }

    public function login(LoginRequest $request)

    {

        $credentials = $request->validated();

        if (!Auth::attempt($credentials)) {

            return response(['message' => 'Provided email or password is incorrect'], 422);

        }

        $user = Auth::user();

        $token = $user->createToken('main')->plainTextToken;

        return response(compact('user', 'token'));

    }

    public function logout(Request $request)

    {

        $user = $request->user();

        $user->currentAccessToken()->delete();

        return response('', 204);

    }

}
2. Creating Login and Signup Requests
Requests are used to validate input data. Create the requests for login and signup:
./vendor/bin/sail artisan make:request SignupRequest./vendor/bin/sail artisan make:request LoginRequestEdit the generated files app/Http/Requests/LoginRequest.php and app/Http/Requests/SignupRequest.php:
LoginRequest.php
<?php

namespace App\Http\Requests;

use Illuminate\Foundation\Http\FormRequest;

class LoginRequest extends FormRequest

{

    public function authorize(): bool

    {

        return true;

    }

    public function rules(): array

    {

        return [

            'email' => 'required|email|string|exists:users,email',

            'password' => ['required']

        ];

    }

}
SignupRequest.php
<?php

namespace App\Http\Requests;

use Illuminate\Foundation\Http\FormRequest;

use Illuminate\Validation\Rules\Password;

class SignupRequest extends FormRequest

{

    public function authorize(): bool

    {

        return true;

    }

    public function rules(): array

    {

        return [

            'name' => ['required', 'string'],

            'email' => ['required', 'email', 'unique:users,email'],

            'password' => [

                'required',

                'confirmed',

                Password::min(8)->letters()->symbols()->numbers()

            ]

        ];

    }

}
3. Configuring Authentication Routes
Add the authentication routes in the routes/api.php file. In this file, we should implement each route to be requested as an axios request in the front-end:
<?php

use App\Http\Controllers\Api\AuthController;

use App\Http\Controllers\Api\UserController;

use Illuminate\Http\Request;

use Illuminate\Support\Facades\Route;

Route::middleware('auth:sanctum')->group(function () {

    Route::get('/user', function (Request $request) {

        return $request->user();

    });

    Route::post('/logout', [AuthController::class, 'logout']);

    Route::apiResource('/users', UserController::class);

});

Route::post('/signup', [AuthController::class, 'signup']);

Route::post('/login', [AuthController::class, 'login']);
4. Creating the UserController
Create a controller to manage users:
./vendor/bin/sail artisan make:controller Api/UserController --model=User --requests --resource --apiEdit the file app/Http/Controllers/Api/UserController.php with the following code:
<?php

namespace App\Http\Controllers\Api;

use App\Http\Controllers\Controller;

use App\Http\Requests\StoreUserRequest;

use App\Http\Requests\UpdateUserRequest;

use App\Http\Resources\UserResource;

use App\Models\User;

class UserController extends Controller

{

    public function index()

    {

        return UserResource::collection(User::query()->orderBy('id', 'desc')->paginate(10));

    }

    public function store(StoreUserRequest $request)

    {

        $data = $request->validated();

        $data['password'] = bcrypt($data['password']);

        $user = User::create($data);

        return response(new UserResource($user), 201);

    }

    public function show(User $user)

    {

        return new UserResource($user);

    }

    public function update(UpdateUserRequest $request, User $user)

    {

        $data = $request->validated();

        if (isset($data['password'])) {

            $data['password'] = bcrypt($data['password']);

        }

        $user->update($data);

        return new UserResource($user);

    }

    public function destroy(User $user)

    {

        $user->delete();

        return response('', 204);

    }

}
5. Creating Store and Update Requests
Requests are used to validate input data. Create requests to validate user data to be stored and updated via front-end requests:
StoreUserRequest.php
<?php

namespace App\Http\Requests;

use Illuminate\Foundation\Http\FormRequest;

use Illuminate\Validation\Rules\Password;

class StoreUserRequest extends FormRequest

{

    public function authorize(): bool

    {

        return true;

    }

    public function rules(): array

    {

        return [

            'name' => 'required|string|max:55',

            'email' => 'required|email|unique:users,email',

            'password' => [

                'required',

                Password::min(8)->letters()->symbols()

            ],

        ];

    }

}
UpdateUserRequest.php
<?php

namespace App\Http\Requests;

use Illuminate\Foundation\Http\FormRequest;

use Illuminate\Validation\Rules\Password;

class UpdateUserRequest extends FormRequest

{

    public function authorize(): bool

    {

        return true;

    }

    public function rules(): array

    {

        return [

            'name' => 'required|string|max:55',

            'email' => 'required|email|unique:users,email,' . $this->id,

            'password' => [

                'confirmed',

                Password::min(8)->letters()->symbols()

            ],

        ];

    }

}6. Creating the UserResource
Create a resource to format the output of user data:
./vendor/bin/sail artisan make:resource UserResourceEdit the file app/Http/Resources/UserResource.php with the following code:
<?php

namespace App\Http\Resources;

use Illuminate\Http\Request;

use Illuminate\Http\Resources\Json\JsonResource;

class UserResource extends JsonResource

{

    public static $wrap = false;

    public function toArray(Request $request): array

    {

        return [

            'id' => $this->id,

            'name' => $this->name,

            'email' => $this->email,

            'created_at' => $this->created_at->format('Y-m-d H:i:s'),

        ];

    }

}
7. Creating the Database Seeder
Create a seeder to populate the database with test users:
./vendor/bin/sail artisan db:seedEdit the file database/seeders/DatabaseSeeder.php with the following code:
<?php

namespace Database\Seeders;

use App\Models\User;

use Illuminate\Database\Seeder;

class DatabaseSeeder extends Seeder

{

    public function run(): void

    {

        User::factory(10)->create();

    }

}
8. Running Migrations and Seeders
Run the migrations and seeders to create tables in the database and populate them with test data:
./vendor/bin/sail artisan migrate --seedConclusion
Now you have a basic user management system with React, Laravel, using Docker, including authentication, creation, updating, displaying, and deleting users. This system can be expanded as needed to meet your project requirements.


1 comentário